
27 Kitchen Lighting Tips
Search
The kitchen is truly the heart of the modern home. No longer is the kitchen an isolated space meant only for food preparation. Since families spend most of their “together-time” in the kitchen, it is especially important to light it properly. Because of the wide variety of tasks performed there, the kitchen can be the most complex lighting situation in your home, and most have major lighting mistakes. We can help you avoid these lighting errors by considering factors like: functionality, style, color, light quality, safety, etc. This guide is designed to help you light your kitchen like a pro. We compiled our best kitchen lighting tips and then we asked some of America’s top interior decorators for more ideas so you can create a perfect plan for your kitchen. LampsUSA wants to help everyone become a smarter consumer and save you from repeating mistakes that can be easily avoided.
Kitchen Lighting Design Tips from the Pros
1. Use Natural Sunlight
The sun is the original and best source of light, so be sure to take full advantag of natural sunlight in your kitchen. Sunlight is nature’s ambient light source. Consider skylights or solar-tubes if you are not blessed with large windows. By harnessing indirect sunlight, you can use less electric light. So you will save energy while creating a warm, inviting atmosphere.

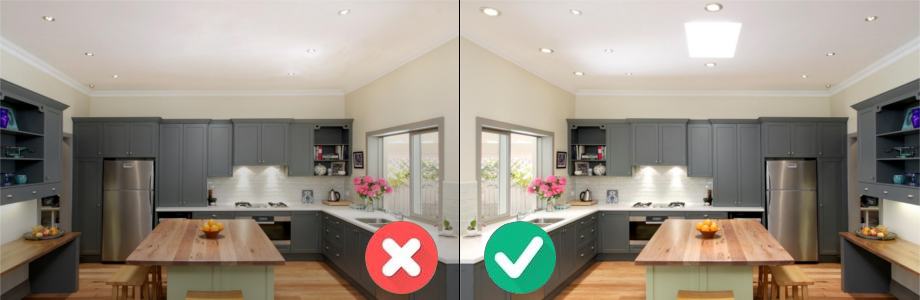
2. Avoid the “Glare Bomb”
The #1 error is to try to light everything with one fixture. What you end up with is single source that creates glare on some surfaces and shadows elsewhere. Fortunately, glare bombs are easy to avoid if you use light layers.
3. Light Layers
You may have heard designers recommend “layering” your light (layering is the most common tip we received from designers. If you remember only one idea from this article, be sure to use layered light!)
But how do you actually “layer” light and how do you know if you are doing it correctly?
A well-lit kitchen must include 4 types of lighting:
- Ambient Light – General illumination to light the overall room.
- Task Lighting – intense light focused where you need it, to help you get jobs done like chopping, washing, cooking, reading, etc.
- Accent Lighting – light that helps draw attention to art, family photos, fireplaces, trophies, etc.
- Decorative Lighting – Lighting is your home’s jewelry. Just because a light is functional, doesn’t mean it can’t be beautiful.
Keep reading and we will explain how to implement these 4 layers. Whenever you consider a kitchen light, try to define which of these 4 functions it will serve. (Be aware most ambient lights should also be decorative, and give you a thrill each time you see it!) NEVER forget the power of layered light.

Nashville’s super Interior Designer Marcelle Guilbeau says it best:
"Light layering affects the ambiance in your space by including several different light sources for the same space. Bring in additional light sources and don’t merely use task lighting. Light Layering is my go-to solution to help shift the ambiance and transform an open kitchen & family room space to one that is perfectly lit for entertaining guests. You can achieve this using dimmers on the task lighting, so you can turn them down for special occasions, and then illuminate the space with other light sources, such as a table or standing lamp, or your other accent lights. This allows the focus to go from a bright kitchen, any special art you may have in your family room or the rooms other focal points.”

4. Layer 1
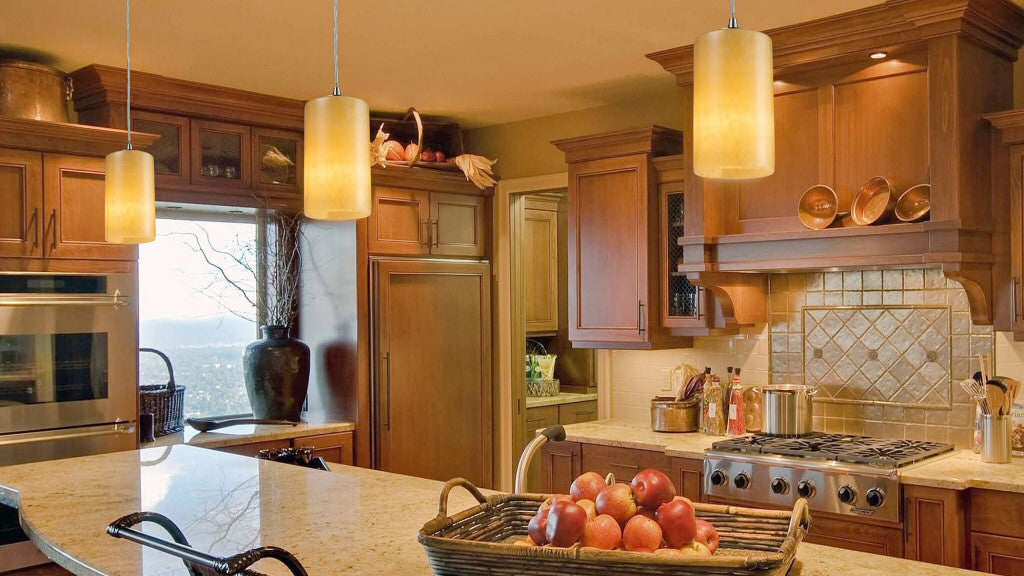
Start with Ambient Light – Think of ambient light as general soft illumination to light the overall room and help “humanize” your space. Every kitchen has an ambient light source. The problem is that many kitchens stop there and don’t add the other critical layers. The most common ambient light solutions in a modern kitchen are chandeliers or semi-flush lights over dining tables, or mini-pendants or island lights over center islands.
5. Layer 2
Choose Decorative Lighting – Some lighting pros speak of decorative lighting along with Ambient because the 2 are closely related, but we wanted to break them out to make sure you explicitly consider the look and feel of your light fixtures. Lighting is the jewelry of your home and it should reflect your personality. Plus you should LOVE the way it looks. Since the kitchen has become the main gathering center for parties, your lighting will be noticed so choose pieces you are proud to show your guests. Be sure to pick something that blends with your décor but is unexpected (or at least interesting.) The world has enough boring lights. Find something you love for your kitchen.

6. Layer 3
Add Critical Task Lighting – intense light focused where you need it, to help you get jobs done like chopping, washing, cooking, reading, etc.
7. Layer 4
Consider Accent Lighting – light that helps draw attention to art, fireplaces, trophies, etc.
8. Always Add Dimmers
Light layers work best when you a dimmers and plenty of switches. (you may have to upgrade to LED dimmers when you upgrade to LED bulbs)
9. Add Variety
Don’t overuse any one type of light in your kitchen. LampsUSA staff designer Deb Milis says
“One common mistake is to rely too much on any one type of lighting. I have seen kitchens with ONLY recessed cans, which results in unflattering shadows, especially on our faces. I have also seen kitchens lit with only hanging lights, which tends to overpower the other design elements in the room. If you are properly layering your light (see tips 3-7) then you should be adding enough variety. ”
10. Add One Statement piece
When we add a variety of lighting, we don't rely too much on hanging lights, so we can now make the few lights that remain truly memorable. Find a light you LOVE and make it the star of your kitchen. Be sure to ask the opinion of a lighting designer or friends with good taste. But be sure that you love it, because you will be the one looking at it everyday.

Kitchen Lighting Positioning - (How to fine tune your kitchen light fixture locations)
11. Kitchen Chandelier Height?
– Homeowners are often uncertain about how high to hang their new kitchen chandelier.

Brenda Tucker, Interior Designer with Center Stage Interiors in Arizona hears this question over and over again.
"A good rule of thumb is this...the very bottom of the chandelier should be 32" to 34" above the top of the dining table. Since most dining tables are 30" in height, the bottom of the chandelier should be 62" to 64" from the floor.”
One variable that might alter this guideline is your ceiling height. If you have 10’ or higher ceiling, then some designers suggest raising the light 3” for every foot over 8’. (Remember, not all designers agree on this, so the best strategy is to test the fixture at 33” above your table, then try it higher.) If your fixture is larger, it might look better higher. Let your eye be your judge. Guidelines need not be followed 100% of the time.
12. Recessed Light Positioning
Rookie builders or installers sometimes center the can lights on the middle of the walkway.

Design pro Monique Flesher (Monique Jacqueline Design) knows better:
“I think one of my most important lighting design tips for the kitchen is to not light your pathways but rather your countertops! If you place their recessed can lighting in the path centers, when you are working at your countertops, the lighting is behind you and you cast shadows your countertops, where you need the lighting the most. When I place my recessed cans, I have the can center placed 23” off my back wall, This way the light is grazing the countertop edge and the light is exactly where my client’s need it, in front of them, not behind them!”

Designer Debra Cruz couldn’t agree more:
“Center the ceiling cans over the front edge of the counter tops. This way the front of the beautiful cabinets are highlighted showcased. And, the front portion of the counter top (work area) is better lighted. Can lighting in the walk ways does not help with task lighting. We need best lighting possible where we prepare our meals. On the front of the counter tops!”

13. Light the Triangle!
Always consider the “Kitchen Work Triangle”, which is the common work-path from your Refrigerator to your Stovetop, to your Sink. (You may wish to make this a rectangle and include your most used countertop where you chop veggies, etc.) Kitchen designers strive to keep an efficient flow in the triangle so lighting these areas is critically important. This is where our Task lighting layer comes in handy. Be sure you have extra downlights on your work surfaces. Under-cabinet and recessed lights work the best over work surfaces and flush mounts work well over the sink.
14. Consider The “Rule of Three”
Humans perceive balance when we repeat an element three times. If your kitchen island is large enough, you can add 3 pendant lights. In general, you should install one pendant for every two feet of counter space. Try to use an odd number of pendants to create better balance, but don’t force it if you don’t have enough room. Thinner pendants, might look better with extra fixtures.

Designer Rosa Santiago Zimmermann has her own take on the “rule of 3”:has her own take on the “rule of 3”:
“In numerology 3 is considered the perfect number. However, when it comes to lighting, and in particular to the perfect chandeliers for the perfect space, combining them in 3’s makes the right space go from nice to WOW! Be mindful of the scale! Be bold! Be daring! And don’t be afraid to mix and match styles and sizes. Create the spaces you’ll love to live in!

15. Kitchen Light Sizing
The basic rule here is that the lighting size should be proportional to the kitchen size. Consider both square feet and ceiling height. The larger the kitchen, the larger scale lighting you should consider. Fixture manufacturers make some great “over-sized” fixtures, so you have lots of choices, but be careful not to let the lighting over-power the room.
16. Can you See me Now?
Keep your sight lines open.
Rosa Santiago Zimmerman elaborates:
"You want to be able to see your guests, and you don’t want your lights to get in the way. With 8’ ceilings, sometimes that is a challenge. I recommend holding lights up before installing to make sure you don’t block sight lines”

17. Kitchen Island Lighting Tips
Most kitchens have an island right in the center of the action. So lighting this critical area is very important. You want to make sure to have proper surface illumination, but most lights will do that. Factors to consider when choosing island lighting:
• If you have only one junction box, consider a traditional Island light, which only needs one electrical connection. But often, individual pendants will look better, so hire an electrician if you need one.
• If you have several light layers with good ambient light, you can consider some of the stylish opaque designs that only provide down-light. But most kitchens will need the island lights to help with the ambient light, so keep that in mind.
• The island is a good place for your statement piece. (See tip #10)
• Always add dimmers. Island lights are asked to perform task and ambient functions and you need dimmability to adapt to changing jobs.
• Recessed lights can work above an island, but just be sure you have other good ambient light sources.
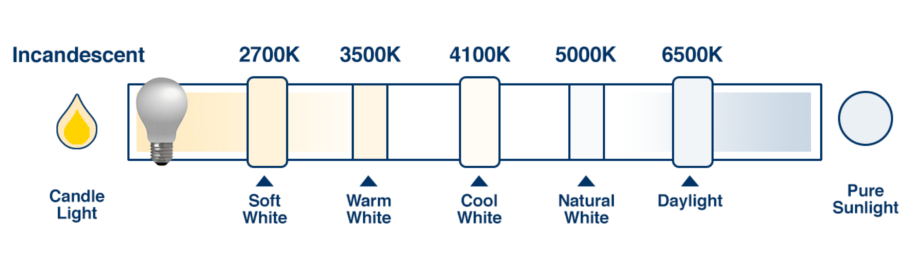
18. Bulb Color Temperature
Light bulbs today have so many options, choosing the right one can be difficult. One increasingly important factor is the bulb “color.” Color temperature determines the light color and is measured in “degrees Kelvin.” Typical bulbs vary from 2,400k (yellow) to 4,500k (cool white) to 6,000k (crisp bluish “daylight”) You will get better results if you keep the light in your kitchen at the same “color Temperature” throughout the entire room.
LampsUSA staff lighting designer, Deb Milis has some advice:
“I always recommend matching the bulb color temperature to your kitchen. It’s often a matter of personal preference. Warmer, earthy kitchens look best at color temperatures below 3,000K. Modern white kitchens with lots of glass and stainless steel might look better using cool white at about 4100K.”
Fun Fact: Incandescent bulbs get yellower as they dim, but LED bulbs stay the exact same color temperature as they dim. Keep this in mind as you choose your light bulbs. Always buy 1 test bulb to confirm the color and quality of light looks right before buying them all.
19. Kitchen Lighting Ideas for Style
Lighting helps to set the “mood” of your kitchen. It is important to match the style of your cabinets and furniture.

Kathryn Durkin from Studio Brand Collective in Houston gives us some great advice:from Studio Brand Collective in Houston gives us some great advice:
“By choosing the right light fixture in your kitchen, you can change the mood of your space. Decorative lighting is a great way to explore new styles and reinvent the room while still making the room functional for everyday use. Every space is different, so analyze the natural and overhead light that you have and then decide what style you’d like to add with decorative lighting and lamps. A contemporary chandelier or modern pair of lanterns are 2 sleek options for a kitchen that needs an update. A few industrial pendants are perfect for a loft while keeping a relaxed and pared-down look. A bold pop of color or a slick metallic fixture could be just what a bright, white kitchen needs. The style you choose allows the space to flow seamlessly, so take the time to find the perfect fixture for your home.”


20. Range Hood/Microwave Down lights
Most ranges and built-in microwave ovens include a down-light for lighting the stove-top. In case yours does not, or if the bulb is burned out, consider adding one. Proper stove lighting is essential so don’t miss this task lighting opportunity.
21. Light Kitchen Cabinets and Drawers
LED strip lights allow you to now put lighting into places you never thought possible. Be sure to consider lighting any dark storage area with LED strip lights. These work best if they turn off automatically when the drawer is closed.
22. Pantry Lighting

The pantry has made a comeback, so don’t forget to provide good lighting in your pantry. Flush mount lights tend to work the best. Avoid recessed since they will create only downlight and therefore shadows. A switch connected to your door so they light goes out when you close the door is a great idea.
23. Lighting over Sink
The sink is a key area from the kitchen triangle. Most electricians provide a junction box above the sink. If you have 8’ ceilings, you are limited to flush mount or recessed options. Taller ceilings let you be more creative with pendants or linear suspensions.
24. Under-cabinet Lighting
Kitchen countertops need up to 10 times more light than normal, so be sure to take advantage of the space below your cabinets and add some under cabinet lighting. This is the secret weapon of many designers we talked to. Be sure to mount them at the front of the cabinet and direct the light backwards. This way, you will get even light distribution on the countertop and the backsplash, and will best conceal the light source, thereby reducing glare. If you have shiny back-splash or countertops, be sure to choose an under-cabinet light with a good lens filter to avoid bouncing light directly off the reflective surface. LED makes the best under-cabinet lighting, since it is thin and does not get super hot like xenon or halogen.

25. Bonus Under cabinet Tip
Installing the cabinet lighting at the front of the upper cabinets is a must to achieve this best work space lighting on your Kitchen counters.
26. Plan enough Light for Every Kitchen Area
Countertops and other work areas need way more light. For safety and accuracy, be sure to light each area to at least these foot-candle levels:
| Space/Task | Light Level (Footcandles) |
| Kitchen general lighting (on floor) | 5 |
| Kitchen food preparation (on counter) | 50 |
| Kitchen sink (on top of sink) | 30 |
| Kitchen cooktop (on cooking surface) | 30 |
| Dining (on tabletop) | 20 |
27. Light Differently
Don’t be afraid to break the rules. After all, we are just offering rules-of-thumb and our guidelines can be bent or broken to fit your personal need. Think outside the box if it fits your lifestyle.

Super-Designer to the best homes in New York, Diana Weinstein loves to break rules:
“Personally I LOVE to use lights that are not necessarily "kitchen specific" in the kitchen. I make sure that they function and provide appropriate task light, but as a designer I love to do something that is unusual and different. The right light can take a simple plain kitchen and elevate it to something that looks "designer" and different. I often do the unexpected. I may do two small lights over a rectangular table and one large one over the island depending on the scale which is not the usual, 2 small over the island and one large over dining area. Just about putting my own twist on a space and I LOVE using lighting to do so. I also love to mix finishes on lighting in kitchens. I love to play with proportion and often do large oversized lighting and make the lighting the design feature.”
28. BONUS POSITIONING TIP

"Most kitchen/dining spaces have chandeliers that are centered in the room over the table. However, sometimes the homeowners' table can’t be centered under the chandelier because their table is too big or too small. To eliminate this problem, I suggest you use a flush mount chandelier or fixture. It takes away the problem of your table having to be centered exactly because it is higher up and totally eliminates the problem of having to be centered over the table. Gives you more flexibility with where you put the kitchen table in the room. The most important thing with this tip is that you need to make sure the flush mount fixture is to scale with the table, can't be too small or too big." - Ruthie Staalsen of Ruthie Staalsen Interiors
Explore Topics


Comments
This article has been very informative and a delight to read. The use of low level light and higher voltage light makes perfect sense.
I live in an older home with "" boob" lights galore from the hallways, to the stairways, to the kitchen.
Now that I see the alternatives I am very excited about the possibilities!
We live in a two family home with my son and his family, a wonderful wife and two great younger children and they have the same boob light problems.
Thank you for this article. It has really opened my eyes to some simple decorating changes I can do.